aka 2013 FMQ Challenge #5
*Madness* because I have had several months to do this challenge but I left it to the last minute (always too many deadlines and things to sew-start-finish-dream about)
*Madness* because a tiny centre with many borders GROWS rather larger than you imagine
*Madness* resulting in the invention of a new mantra - say to self before doing ANYTHING - Think twice Sew once (actually it wasn't too bad but there was the occasional reverse sew at the corners)
*Madness* because it was a lot of fun
*Madness* because the moment I rinsed this out to remove the markings with the intention of hanging it in the 'gentle' breeze it started raining (yes, it was forecast and had been threatening all day)
It's all about Borders is the last challenge for me in the SewCalGal 2013 FMQ Challenge.
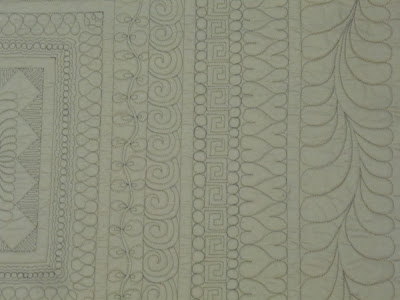
(These photos are all of a 'slightly damp' top - I guess it helps to show the stitching!!).
Design and make a quilt with 8-10 borders, all of them to be different. At least two of them need to be designs shared by Patsy Thompson in last year's border challenge.
A few posts back I shared an EQ7 layout diagram of the quilt I was making for this challenge. I decided to make mine whole cloth style so I drew in all the borders before I got started.
I went back and studied the tutorial from last year. Patsy had used worms, spirals, loopy things and feathers. I saw/remembered how she had varied the motif size and style of each border so it contrasted with its neighbours.
I used these ideas and designs as a basis for my quilt.
My border widths went from 1'' through to 2" and the final border was 4". I inserted ½" 'empty' borders in between every second border. Of course these also increased the total size of the quilt so the last few borders seemed to take forever to get around!! The final size (at this stage) is 36" x 38". I may finish it off with some echo-ing around the outer feathers and then...??!
Here is the resulting top —
The photos don't look very exciting sorry, I used a beige fabric which of course looks very washed out in the photos. But you get the idea at least.
So a final thankyou to SewCalGal for coming up with more fmq challenges for us this year. I have enjoyed extending my skills and using them in different ways.
Thank you for your visits and comments on my last few posts. My apologies to those of you who I haven't replied to or visited. I've been pretty focussed on getting this challenge completed. Normal transmission should return soon!
In the meantime,
Happy stitching,

*Madness* because I have had several months to do this challenge but I left it to the last minute (always too many deadlines and things to sew-start-finish-dream about)
*Madness* because a tiny centre with many borders GROWS rather larger than you imagine
*Madness* resulting in the invention of a new mantra - say to self before doing ANYTHING - Think twice Sew once (actually it wasn't too bad but there was the occasional reverse sew at the corners)
*Madness* because it was a lot of fun
*Madness* because the moment I rinsed this out to remove the markings with the intention of hanging it in the 'gentle' breeze it started raining (yes, it was forecast and had been threatening all day)
It's all about Borders is the last challenge for me in the SewCalGal 2013 FMQ Challenge.
(These photos are all of a 'slightly damp' top - I guess it helps to show the stitching!!).
Design and make a quilt with 8-10 borders, all of them to be different. At least two of them need to be designs shared by Patsy Thompson in last year's border challenge.
A few posts back I shared an EQ7 layout diagram of the quilt I was making for this challenge. I decided to make mine whole cloth style so I drew in all the borders before I got started.
I went back and studied the tutorial from last year. Patsy had used worms, spirals, loopy things and feathers. I saw/remembered how she had varied the motif size and style of each border so it contrasted with its neighbours.
I used these ideas and designs as a basis for my quilt.
 |
| In case you think you only see 7 borders, the first one is the Half Square Triangles and worms around the central block. |
Here is the resulting top —
The photos don't look very exciting sorry, I used a beige fabric which of course looks very washed out in the photos. But you get the idea at least.
So a final thankyou to SewCalGal for coming up with more fmq challenges for us this year. I have enjoyed extending my skills and using them in different ways.
Thank you for your visits and comments on my last few posts. My apologies to those of you who I haven't replied to or visited. I've been pretty focussed on getting this challenge completed. Normal transmission should return soon!
In the meantime,
Happy stitching,


