My quilting thoughts and inspirations sprinkled with a glimpse of life down on the farm

Monday, October 22, 2012

Zig-zagging tutorial

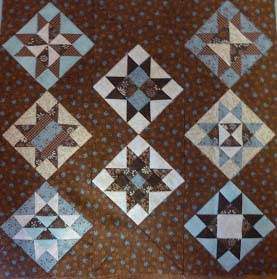
Mini-Quilt top. 16.5 inches square.
After I'd written my last post and received the positive comments with readers saying "I'd like to try that, too", I realised I could have expanded a bit on how I put the zig-zag setting together. I have attempted, therefore, to put a bit of tutorial together.
I used the blocks from the Temecula Quilt Company's latest sewalong. They finished at 4", so were 4 1/2" raw edge to raw edge.
The tutorial, sizes, etc will be based on those 8 star blocks from the Temecula sewalong, but of course you can adapt these to suit your own project.

Zig-Zag setting Tutorial.
One of the outer strips.

Out of the fabric you are using for the sashing/zig-zag setting;
-Cut 4 x 6+7/8" squares; cut each one on the diagonal twice to yield 16 triangles.
-Cut 4 x 3+5/8" squares; cut each on the diagonal once to yield 8 small triangles.

The quilt top is put together in strips - the two outer strips have 3 star blocks in them, and the centre one has just 2 star blocks (refer to main photograph).

I found it easiest to lay all my blocks and triangles out on the floor and sew them together from there. (I tend to get muddled otherwise!)
Arrange the left hand side strip first, as illustrated in the photo to the left. Put your star blocks on point and then add the triangles.
(Photo is photo-shopped as I didn't take photos as I made it!)
Note that 2 small triangles go at the top and 2 small triangles are at the bottom of the outer strips.
To sew; first sew the triangles to opposite edges of each star block.
Centre strip
Match the seams when you sew these units together.


The centre strip uses only the larger triangles. You can see the seam lines on the photo to the right where I have had a play with Photoshop.
You will be joining two large triangles at the top and bottom to create the difference in levels of this row. NO small triangles are used in this strip.

When you have sewn all three strips, you will be able to join them to form the quilt top.


Whew!! I am hoping that this was clear - I found it a fun way to put this mini together and I hope you have fun with it too :-)
Any feedback will be welcome!!
Happy creating everyone,


PS My next challenge will be to quilt this - any ideas of what will work well with zig-zags??
PPS As I have said elsewhere, this is not an original design, one that I have seen around but one that I 'started from scratch' in order to put this mini together :-)

Wednesday, October 17, 2012

Another starry post!

During August the Temecula Quilt Company ran another one of their fun little sewalongs, posting a star block pattern each week for 8 weeks. I diligently sewed along at the time but have only just finished putting the blocks together.
Some of the blocks waiting for further action
I decided to go with a different setting to their one after seeing a zig-zag setting recently and being intrigued with it and it's effect. I realised its just setting triangles with the centre strip 'just moved down a bit' so I had a bit of a play on EQ7 to get the sizes right. This eliminated the need for cutting out lots of testing blocks in order to get it correct! An afternoon of sewing and here is my completed Temecula Stars mini quilt top.
On point and zig-zagged changes the look completely.
The blocks were 4" finished size so this will be about 16 1/2 " when quilted
 and bound.

I have also finished this Christmas Table topper.
 Another fun project where I used EQ7 to help me get sizes and cutting right. I found a block that I liked and adapted it to make the table topper. With pieces this size, the set-in seams were a cinch.
Sorry I've shown this photo before but I just realised the above photo hasn't
 turned out well colour wise. The fabrics are gorgeous!
It feels really good to be getting a bit of sewing done - long may it continue!!
Happy creating every-one,

Tuesday, October 9, 2012

The last one bites the dust!

I'm celebrating!!
I have finished my last appliqué block for my Hop To It quilt!!!
I seem to have been working on these forever but the home straight is in sight!
Block 1 - Rose Hip Heart
The light blue on the left is a new fabric - why I wanted to introduce a new fabric
 on the last block I don't know, but the colour worked so well!
My 12 blocks of Edyta Sitar's Hop To It quilt - a quick layout to see how they look.
You can see a bit of the sashing on the bottom right hand block.
Now it's just the layout to sort, piles of sashing strips to assemble, border fabric to arrange and the quilting to do---whew, nearly finished!
Have a happy week everyone!