My quilting thoughts and inspirations sprinkled with a glimpse of life down on the farm
Showing posts with label Goodnight Irene. Show all posts

Wednesday, July 23, 2014

A flimsy and a (short) tutorial

While hunkering down with all the rain we've had recently I managed a little some sewing time, not much else to do once the animals are fed and the fire stoked!
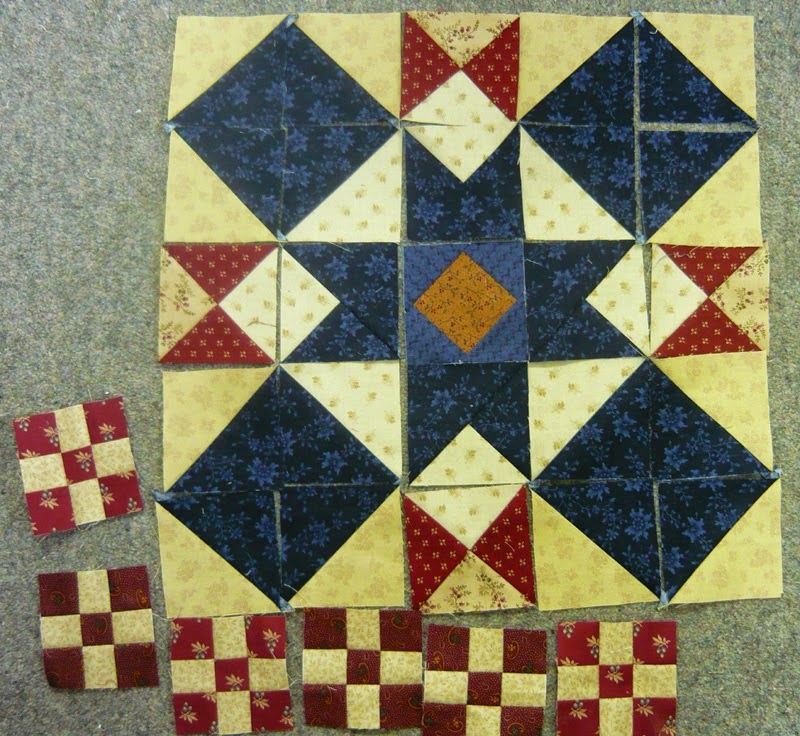
I (finally) got Goodnight Irene, the scrappy sewalong hosted by Terry of Terry's Treasures, to the flimsy stage!! I am really happy with how she is looking! At this stage I have no idea how I will quilt her (any thoughts?) so I guess it's ok that she sits on the flimsy pile for a bit waiting her turn - it will give me some thinking time :-)
"Goodnight Irene" onto the flimsy pile :-)

I also had a little fun making this trivet/hot mat —
I had come across a video on YouTube, Potholders and Kitchen Quilts by Kaye Wood, and thought it would be nice to try it out. It was pretty straight forward to make, and a little different, too. So I don't have to watch the video again I started to take notes, and then thought that it could be a good idea to take photos to remind me and then I thought why not put them on my blog in tutorial form so I can easily access it all and so that others could make one too, if they wished ..... So here it is
(Full credit to Kaye for her YouTube instructions; there is a lot more information on the video, including variations, than what I am writing here, so do go to the link if you are interested.)

Step One; Start with a Hexagon. The ones Kaye used were 8" (measured from a straight side to the opposite side) but mine is 8 1/2" so I adjusted some measurements accordingly.
(Kaye talked in detail about fussy cutting the main fabric so a feature or detail ended up in the centre of the star. I didn't bother).
You also need a 5" strip of contrasting fabric. Because my hexagon was slightly bigger I cut my strip at 6" wide. To determine what width to cut if you have altered the hexagon size, go to step two and play with a square of paper.
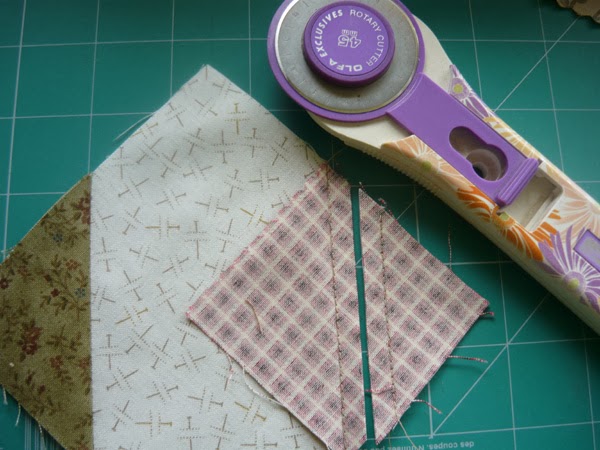
Press the strip right sides together and sew LESS than 1/4" along the bottom edge...see photo below :-)

 Step Two; Slice the strip into 5" pieces.... if you have altered the width of your strip, slice it at that measurement..ie.. My strip was 6" wide so it got sliced into 6" pieces. You will want 6 pieces.
Fold the strip as shown in the photo below, pressing as you do it so that you have nice crisp edges to your triangle. Find the centre of each side of the hexagon and pin on the triangles, matching up the centres.
(*If you are altering the sizes, the bottom of this triangle should measure about the same as a side of your hexagon*).

 Step Three; Sew down the centre of each triangle (where the folded edges meet)to secure it. This is indicated by the pin in the photo below.

 Step Four; To complete your trivet you need some Insul Bright and some cotton batting (this absorbs condensation), both cut the same size as the hexagon. Make the hexagon for the back about 7/8" bigger all round. This will be folded to the front as binding so use a fabric you like for this!!
Lay the background down, wrong side up, then centre the cotton batting, the Insul Brite and the top piece (right side up) on top of it.
Pin through all layers to prevent them from moving, then press over the edges of the backgound twice to form a binding. Pin in place.

Step Five; Carefully machine stitch the binding on. Sew around the outside of the folded triangles (but not on them) to add more definition to the star.
Tada! One finished trivet! These don't take too long to make and I think they would make nice little gifts :-)
I'm keen to make some more...these would be fun as coasters and placemats too..... Maybe they will inspire some of you too.
And thank you to Kaye Wood for her video.
Happy creating everyone, and thanks for visiting,

Friday, June 13, 2014

Sewing along(s) —

As a new weekend approaches, I am still trying to find the time to write about last weekend's sewing! I've had a week of meetings, appointments, a work day and heavy rain (flooding) so it's sped by with little sewing and blogging time.  I started last weekend with a new blade and a new needle - armed with those I felt ready to take on the world!! I spent most of Saturday thinking, planning and cutting ... I seemed to be partway through several projects, all of which had stalled because I was ready for the next step.

I had got Irene (see Terry's Treasures to learn about this sewalong) to this stage and was ready to do the outer border...calculations done.... enough fabric left to do it Terry's way —
— until I did a miscut (probably was day dreaming about the next project I want to start) - oh no, would I have to rethink the outer border, or maybe do some piecing and hope the joins were not noticeable?  I managed to hold my breathe until I got to work on Wednesday... I had taken the last of the fabric on the bolt, but was hoping there would be some precuts still left in the shop and ...lucky me... there were two bullets in the bullet jar!
And the two bullets were just what I needed!
~~<<>>~~
I made a few decisions and did a little cutting on the project I haven't officially started yet - if it's not on my blog, it's not started, right? I am loving this project but needed time/space to decide on my next fabrics. I feel confident with where I am going with this one now.
Hmmm, maybe it is officially on my blog now and maybe I'll have to 'fess up to
another started project pretty soon?
~~<<>>~~
With Irene off the design wall, I pulled out Hop To It....actually it was already out but Mum is coming next week so I needed to take it off the bed in the spare room. More decisions needed with this one, I hadn't been able to decide on the cornerstone fabric, but think that using the background fabric will be fine... my sashings are quite dark so I think it needs the calmness of the creams. Deciding on an outer border will be another path I need to go down!
(Hop To It is an Edyta Sitar quilt, some bloggy friends and I used it as a sewalong 'in the past' (I am scared to think how many years ago - two maybe?!))
~~<<>>~~
I've been wondering who else is doing Pam Buda's Market Day sewalong? I love Pam's mysteries so of course couldn't help myself :-) I also caught up on my cutting for this. (By the way, I met Pam at Pittsburg and she really is a sweetie). This is really intriguing me ... we are making a few small, simple blocks each week so is a good one to cut out and use as a leader/ender. I wonder what will happen?!
Pam is giving instructions for two sizes - I couldn't resist trying them both.
3 1/2" and 2" unfinished sized blocks.
I've started playing with possible layouts but the 'odd' number of some of the blocks are throwing me. Guess I'll have to be patient!
 (Seems the colour went a bit off in this last photo, it's the same carpet as the previous one!).

 I have a few little secret projects I need to complete this weekend, hopefully I can squeeze in a little time cutting and sewing :-)
Happy creating, and thanks for reading to the end :-)

Saturday, April 12, 2014

Irene and FMQing

A quick little Hello to start the weekend with; hasn't the week flown by fast?! I've had a little sewing time, and completed month /row 4 of Goodnight Irene.
I am loving doing this so much - simple and straight forward; I've tried doing it as a Leader -Ender project, but once I pull it out, I'm hooked!
I've also added an extra block at the end of each row to make it a little wider.. now to decide whether it looks lopsided or not - do you think I should make it more balanced by having each row start and finish with a cross block or 16-patch?
This photo is a little dull, while it's not going to be a bright quilt, it's
definitely brighter than this photo shows!
Thank you Terry, once again, for hosting this sewalong, I am really enjoying it. To see the variety of quilts everyone is making, click *here*... Terry has put the link-up on her sidebar which I think is a brilliant idea as it doesn't get lost in amongst her posts!

I squeezed in a little free motion quilting this week. Amy, from Amy's Free Motion Quilting Adventures has started free motion quiltalong Mondays, designed to help us with our fmq-ing skills. At the start of the month she introduces a quilting design. The idea is we have the month to play with it and improve it. Last month was McTavishing which I was a bit slow to join up with.
This month's is a Scroll Flower —
Of course the first step is to get your tension right!! ...
...then you can play!
This was fun. You can see the scroll shape in the centre of the flower - then
a round of petals, then echo the petals once.
Then branch out and make another scroll...and so on.
This is my first attempt at it, I look forward to playing some more and mastering it fully :-) like not getting caught in a corner, keeping my petals nice and round, playing with variations and so on!
Amy gives very clear instructions and a video *here* on her blog, so visit her if you want to have a play too.

I've had such a lot of fun with my free motion quilting that when I had the opportunity, I decided to get myself an HQ Sweet Sixteen. How exciting!!
Nigel was the first one to have a play....
....But then I quilted my first quilt, Paintbox, on it - oh joy!
The Sweet 16s are a sit down machine with the machine facing you straight on; you still move the fabric around, just like you do with standard machine fmqing. There is a lot more room and other bells and whistles. I'm still mastering it, but am thoroughly enjoying it so far!! Here's to lots more adventures :-)
I have some sewing with friends planned for this weekend, so must get myself organised..... have a great weekend,
Happy sewing, and thank you for visiting,

Tuesday, March 18, 2014

Weekend Sewing

We spent Friday battening down the hatches in preparation for Cyclone Lusi which was bearing down on New Zealand. As we are in drought conditions we were excited about getting some rain and we were happy to put up with the strong winds if we were going to get a good downpour. Sadly we got some rain (and a fair bit of wind) but not nearly the amount predicted....
....However it was 'stormy' enough to stay inside and sew!!
First up, I got the final borders on this quilt for hubby! As he has been waiting patiently for this for a few years and as March is his birthday month, this one has gone to the top of my quilting pile!! (I thought I had it to the flimsy stage a while ago but decided I wanted the extra size created by the borders.)
This is a Cozy Quilt Designs pattern using a Reproductions Jelly Roll.
Then I finished up this little cutie for a friend - I love the little hanger! The stitcheries are from the Anni Downs book called Simple Pleasures.
Isn't my calendar a great backdrop for
this photo?!
Last post I said I was putting 'Goodnight Irene' back into leader-ender status; however I got a little hooked on her and on Sunday afternoon she took over my life and I have got her to this stage. I am now caught up - I am sewing this one with Terry of Terry's Treasure - she has a linky on her side bar so everyone can share their progress. And it's not too late to join in if you want to use up some scraps too!
This photo is a little murky actually but you get the idea.
I have decided not to join the rows yet just in case I need to do some colour re-balancing at a later stage. I'm tempted to make it a little wider but I will see how my scraps go and decide later on.

As this is quite a photo-light post (odd for me!), I just had a quick look through my camera and have realised that I had nearly forgotten to share one other sample I made for The Country Yard for our New Year's launch.
This is a Crabapple design and is mounted in a picture frame for something a little different; isn't it lovely? (No quilting needed!) The doiley is an old one which I trimmed up and tea-dyed.
That's another two finishes for this month - how exciting!!
I hope everyone else had a productive weekend as well, thank you for visiting,
Happy stitching, have a great day!

Thursday, March 13, 2014

Where to start?

You know that feeling that you have when deadlines are met, the climax has happened and you are left hanging - what to do next? Well, that's been me this week! (You can read my last post here if you have no idea what I am talking about!)
The need to sew is so ingrained in me that it didn't take long for my itchy fingers to start wriggling again.
But what to do?
I decided a good start would be to have a good look at the leader and ender project I've had in the background for the last few weeks. I always like to have a leader and ender project (ideally a scrap project so I don't have to think too hard) on the go. 'Goodnight Irene' is a good gobbler of 2.5" squares, of which I have plenty! Terry from Terry's Treasures has inspired many with this project, and it goes together very quickly and well.
Goodnight Irene so far. After looking at others in Terry's linkups,
I think I am going to slow down on my use of the creams, and try to
make those 16 patch blocks a little more colourful.
And as is the way, scrap sewing does not always use scraps - it generates them too.......!!
I've been sewing 2 seams on the X-block instead of one so that when I trim it off,
I have a half square triangle - something else to find a project for!!
Now that my head is a little more sorted and I have some direction for Irene, I will send her back to leader and ender status and poke around for my next main project - I have plenty to choose from!!
~~//\\~~
In the evenings I have pulled out my applique again, starting on Block 3 of the 2103 Quiltmania mystery. Here's the first little person from this block —
Can you guess what they are doing this time?!
~~//\\~~
 I said in my last post that I have a couple more projects (yaay, finishes) to share; ones that I've been sewing at home for the New Year's Launch my favourite quilt shop held last week. This first one is a 'Seasons' project we are doing, with the first season being Autumn (naturally, for those of us in this hemisphere!). As the year progresses we will work our way through the other seasons.
The stand for them is really lovely and I look forward to making more of these little hangings :-)
 And on the wall in this corner of the shop you can see another wall hanging I have made; the long, skinny-ish one —
When I remember the name and designer I will edit this post!
The single ladies are also very lovely and are by the same designer.
Quite clever how she has done the perspective, from left to right rather than
front to back.
 
Isn't she sweet?!
It's been nice to have these finishes, but now it's time for me to rummage through my sewing cupboard :-)
Happy stitching, have a great day - and thank you for visiting