
 |
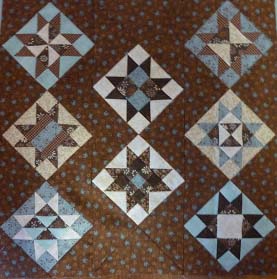
| Mini-Quilt top. 16.5 inches square. |
The tutorial, sizes, etc will be based on those 8 star blocks from the Temecula sewalong, but of course you can adapt these to suit your own project.
Zig-Zag setting Tutorial.
 |
| One of the outer strips. |
-Cut 4 x 6+7/8" squares; cut each one on the diagonal twice to yield 16 triangles.
-Cut 4 x 3+5/8" squares; cut each on the diagonal once to yield 8 small triangles.
The quilt top is put together in strips - the two outer strips have 3 star blocks in them, and the centre one has just 2 star blocks (refer to main photograph).
I found it easiest to lay all my blocks and triangles out on the floor and sew them together from there. (I tend to get muddled otherwise!)
Arrange the left hand side strip first, as illustrated in the photo to the left. Put your star blocks on point and then add the triangles.
(Photo is photo-shopped as I didn't take photos as I made it!)
Note that 2 small triangles go at the top and 2 small triangles are at the bottom of the outer strips.
To sew; first sew the triangles to opposite edges of each star block.
 |
| Centre strip |
The centre strip uses only the larger triangles. You can see the seam lines on the photo to the right where I have had a play with Photoshop.
You will be joining two large triangles at the top and bottom to create the difference in levels of this row. NO small triangles are used in this strip.
When you have sewn all three strips, you will be able to join them to form the quilt top.
Whew!! I am hoping that this was clear - I found it a fun way to put this mini together and I hope you have fun with it too :-)
Any feedback will be welcome!!
Happy creating everyone,

PS My next challenge will be to quilt this - any ideas of what will work well with zig-zags??
PPS As I have said elsewhere, this is not an original design, one that I have seen around but one that I 'started from scratch' in order to put this mini together :-)
I love this setting. I wish I hadn't put all three of my Summer Stars quilts together already. I would have liked to try this out. I'll have to save this and try it in the future when I have some little blocks put together that need a good setting.
ReplyDeleteAs to quilting--as inexperienced as I am, I don't have much to say. My first thought was a snaking feather. I'll be interested to see what you do.
Thanks for sharing.
ReplyDeleteThanks for sharing! Your stars are so pretty!
ReplyDeleteI am going to follow your blog; it is really fantastic.
Cheers,
Jeanneke.
Aren't you a clever photoshopper! Very understandable. As for quilting, you could do the obvious and do rows of zigzag lines...other than that I don't know. But it's so teeny and detailed you wouldn't want to overwhelm it.
ReplyDeletePerfectly understood my friend and a lovely little quilt it is. Love the unusual colour combination.
ReplyDeleteYou know somewhere at the bottom of my pile of WIPS there is a zig zag that I am going to need this tutorial for
ReplyDeleteThanks Raewyn , great tutorial and I will make note of this for later ,it is a fun way to put blocks together , makes for an interesting setting :-)
ReplyDeleteThanks for the great tutorial!!
ReplyDeleteI love the colour-combi.
Hugs
Gitta
This is such a lovely setting for your quilt.
ReplyDeletegreat explanation of setting.
ReplyDeleteI like it. I just finished quilting my little star quilt. Now to get the binding on.
I like staight lines to emphasis the zig zag design. Maybe 3 lines in the zig zag sections. just an idea.
love your star table topper too. neat shape.
Thanks for stopping by to comment Raewyn....love your tutorial. There are some great practice pieces out there!! I hope I get that good one day. But I am relaxing more now.
ReplyDeleteWow! Those stars are really tiny. Thanks for explaining the setting. I have a bag of nine patches that would look nice set that way. Cute little quilt.
ReplyDelete